
Introduction to Hand Gesture Recognition Project
This article focuses on a hand gesture recognition project using Python and various libraries. The main goal is to enable the computer to recognize different hand gestures through the camera and perform corresponding operations.
Setting Up the Project in VS Code
- Create a New File: Open Visual Studio Code and create a new file named
Hand_Pos.py. -
Import Libraries:
-
Import
cv2, which is the OpenCV module used for image processing functions. -
Import
Mediapipe, the main model suite for advanced functions like hand detection and face recognition.
-
Initializing the Camera
-
Start the Camera: Use
cv2.VideoCapture(0)to start the computer's default camera. The parameter0represents the first camera device. Assign this camera control object to the variablecap.- If you want to use the second camera, change the parameter
0to1or2. -
Set Up a Loop to Capture Frames:
-
Create a
whileloop to continuously capture frames from the camera. -
Inside the loop, use
cap.read()to read the camera frame. It returns two values:ret(indicating whether the frame was read successfully) andimg(the captured frame data). -
If
retisFalse(e.g., camera not inserted or device abnormal), print an error message and end the loop. - Display the Frame: Use
cv2.imshowto display the frame in a window named "Joyous img". - Check for Keyboard Input: Use
cv2.waitKey(1)to check for keyboard input every 1 millisecond. If the user presses the 'q' key (make sure to switch to English), terminate the loop and end the program.
- If you want to use the second camera, change the parameter
Adding MediaPipe Hand Detection
- Get the Hand Detection Tool: Through
mp.solutions.handsmodule, get the MediaPipe hand detection tool and name itmp_hands. -
Create a Hand Detection Model Workspace:
-
Use the
withsyntax to create a workspace for the hand detection model. -
Pass several parameters to set the model's behavior:
-
model_selection=0for a simpler model suitable for devices with limited performance. -
max_num_hands=1to detect one hand initially. -
min_detection_confidence(range 0 - 1) represents the model's confidence in determining if it's a hand. -
min_tracking_confidence(range 0 - 1) is the stability requirement for key point tracking after detecting a hand. - Convert Image Format: Since the camera reads images in BGR format and MediaPipe needs RGB format, convert the image to RGB and store it in the variable
img2. - Process the Image with the Model: Pass the image to
hands.processfunction. This analyzes the image for hands and detects the coordinates of 21 hand key points, which are stored in theresultsvariable. - Print Key Point Information: Print
results.multi_hand_landmarksto see the key point information. When there is no hand in the frame, the result isNone. When a hand is present, a set of x, y, z coordinates (where x is the horizontal axis, y is the vertical axis, and z is the depth) will be displayed.
-
-
Drawing Hand Key Points on the Image
- Import Drawing Tools: Import MediaPipe's drawing tools and style modules. The drawing tool is used to draw nodes and skeletons, and the style module is used to change colors and shapes.
-
Draw Key Points and Skeleton:
-
Use an
ifstatement to check if a hand is detected. If so, use aforloop to process each of the 21 key points. -
Call the
draw_landmarksfunction with five parameters:-
img: The image on which to draw. -
hand_landmarks: To mark the 21 key point positions on the hand. -
HAND_CONNECTIONSto draw the hand skeleton.
-
-
Optionally, adjust the fourth and fifth parameters to change the size, color, and transparency of the nodes and the color and thickness of the lines.
-
Adjusting MediaPipe Hand Detection Parameters
-
Max Number of Hands:
-
Initially set
max_num_handsto 1. When two hands are raised, only one hand is detected. -
Change it to 2, and both hands are successfully detected. This can be adjusted according to the application scenario.
-
Hand Detection Confidence:
-
Set
min_detection_confidenceto 1.0. The system is too strict, and even a real hand may not be detected. -
Set it to 0.1. The detection sensitivity increases, but there is a higher chance of false positives, like detecting a non - hand object (e.g., a toy) as a hand.
-
Key Point Tracking Confidence:
-
Set
min_tracking_confidenceto 1.0. Even if a hand is detected, key points may not be displayed. -
Set it to 0.1. Key points are more likely to appear, but there may be unstable or incorrect tracking.
-
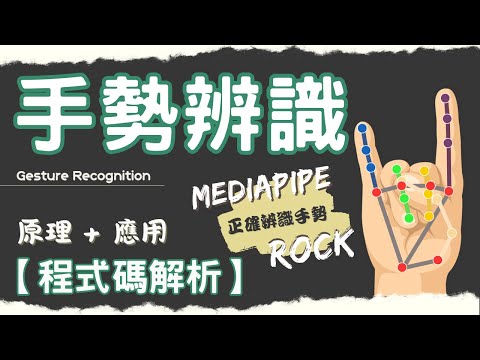
Implementing Hand Gesture Recognition
-
Principle of Hand Gesture Recognition:
- Observe the curling of each finger to determine the gesture. For example, for the middle finger, calculate the angle between two vectors formed by key points to determine if it is straight or bent.
-
Writing the Angle Calculation Function:
-
Define a function
vector_2d_angle()to calculate the angle between two 2D vectors. -
Use the dot product formula to calculate the angle, and handle the case of division by 0 by setting the angle to 180 degrees.
-
Getting Finger Skeleton Vectors:
-
Define a function
hand_angle()to get the vectors of the finger skeletons. -
For each finger, calculate two vectors from specific key points and use the
vector_2d_angle()function to calculate the angle. Store the angles of all five fingers in a list and return it. -
Defining Hand Gesture Judging Conditions:
-
Define a function
hand_pos()to judge the hand gesture based on the angles of the fingers. -
Set a judgment standard: if the angle of a finger is less than 50 degrees, it is considered straight; if it is greater than or equal to 50 degrees, it is considered bent.
-
Write logical judgment statements for different hand gestures, such as 'good' (thumb straight, other fingers bent), 'no!!!' (only middle finger straight), 'ROCK!' (thumb, index finger, and little finger straight), '0' (all fingers bent), and '5' (all fingers straight).
Displaying Hand Gesture Results
-
Setting Up the Display:
-
Move the camera - opening code for better organization.
-
After identifying the hand gesture, use
cv2.putText()to display the gesture name on the image. Set parameters such as font style, size, color, and thickness. -
Preparing Key Point Coordinates:
-
Create three lists:
finger_pointto store the actual (x, y) coordinates of each key point, andfxandfyfor the x and y coordinates for the mosaic. -
Use a
forloop to extract the coordinates of each key point. Note that MediaPipe returns normalized values, so multiply them by the actual widthwand heighthof the image. -
Calculating and Displaying Gestures:
-
Pass the
finger_pointdata to thehand_anglefunction to calculate finger angles. -
Then pass the angles to the
hand_pos()function to determine the hand gesture. -
Use
cv2.putText()to display the gesture name on the image.
-
Adding Mosaic for Inappropriate Gestures
-
Detecting the 'No' Gesture:
-
When the recognized gesture is 'no!!!' (only middle finger straight), calculate the range of the middle finger on the image.
-
Use
max()andmin()functions on thefxandfycoordinates to find the outermost points, and add an expansion range of - 10. -
Perform boundary checks to ensure the mosaic area does not exceed the image boundaries.
-
Creating the Mosaic:
-
Extract the mosaic area from the original image
imgbased on the calculated range. -
Resize the area to an 8x8 pixel small image to make it blurry.
-
Resize the blurry image back to the original size using the nearest - neighbor interpolation method to create a mosaic effect.
-
Paste the blurry image back to the original position.
-
Use an
elsestatement to handle cases when the gesture is not 'no!!!'.
-
Conclusion and Future Applications
This hand gesture recognition project allows for real-time gesture recognition and additional processing for specific gestures. It has practical applications in privacy protection, video games, and interactive design. If this tutorial is helpful, please like, subscribe, and share.
About MediaPipe
MediaPipe is an open-source cross-platform framework by Google for real-time visual and machine learning processing, especially suitable for image recognition, hand tracking, and face detection tasks. It simplifies complex image processing tasks by providing easy-to-use modules.
Testing the Installation
Before starting the project, ensure the successful installation of three key libraries: mediapipe, tensorflow, and opencv-python. You can test the installation by running simple import commands in the Python environment. If there are no errors, the installation is successful.
 {#
{#  {#
{#